Nowadays, there’s a general understanding and belief that all businesses need a quality website. Whether you’re an entrepreneur just starting out, a solo act calling your own shots, or a business that’s been around the block — a good website will help answer questions, support your brand, and make money.
Simply put, if you have a website that looks attractive and performs well you’ll reap the rewards.
But what if you need to make a website specifically for members with different tiers, levels of content, and more? What’s the best way in the sea of options?
We’ve got you covered.
The Limelight Theme makes creating a quality website as quick, easy, and customizable as possible.
If you’re a business owner or entrepreneur who offers some sort of membership service, you know how crucial your website is. You could be offering classes, training, gym memberships, subscription boxes, or beyond — the fact is, more and more users are buying online. And when it comes to memberships, users are both purchasing memberships and maintaining them via the web.
So what exactly does the Limelight Theme include that will help you create a killer membership website?
Read on to learn more about what the Limelight Theme offers for membership sites and a step-by-step basics walkthrough of how to use it!
Theme Features for Membership Sites
The Limelight Theme bundle offers various options and pre-loaded plugins to support all of your website needs. Included are the Limelight Forms and the Limelight Checkout plugins, which are especially useful for building a membership site. The theme also incorporates user roles and restriction settings, so you can make sure that only certain levels of members have access to specific content.
Our goal was to create a theme packed with so much value and such a variety of tools and options that a person wouldn’t need to look anywhere else (or spend any more money) for additional bells and whistles. And you won’t.
Using the Limelight theme means no extra plugins are necessary, and you’ll have your membership site up and running in no time.
To see the theme features in detail, including descriptions and examples, follow the step-by-step basics walkthrough below! We’ve created a dummy account and website to show you exactly how the theme and plugins work.
Please note: You need to upload the Limelight Theme into WordPress and make sure that all of the plugins that come with it are fully downloaded before being able to use the following functions.
User Signups with Limelight Forms
First up are all of the options with Limelight Forms.
The Limelight Forms plugin is very handy for getting site visitors’ information. If you’re building a membership website, odds are you’ll need to collect information for one reason or another!
Limelight Forms provides a way to create a signup list for an email, register a user, and more. Keep in mind — the forms are not a way to incorporate paid membership options.
No matter how you want to use them, the forms will definitely help get your membership site up and running. Let’s jump in!
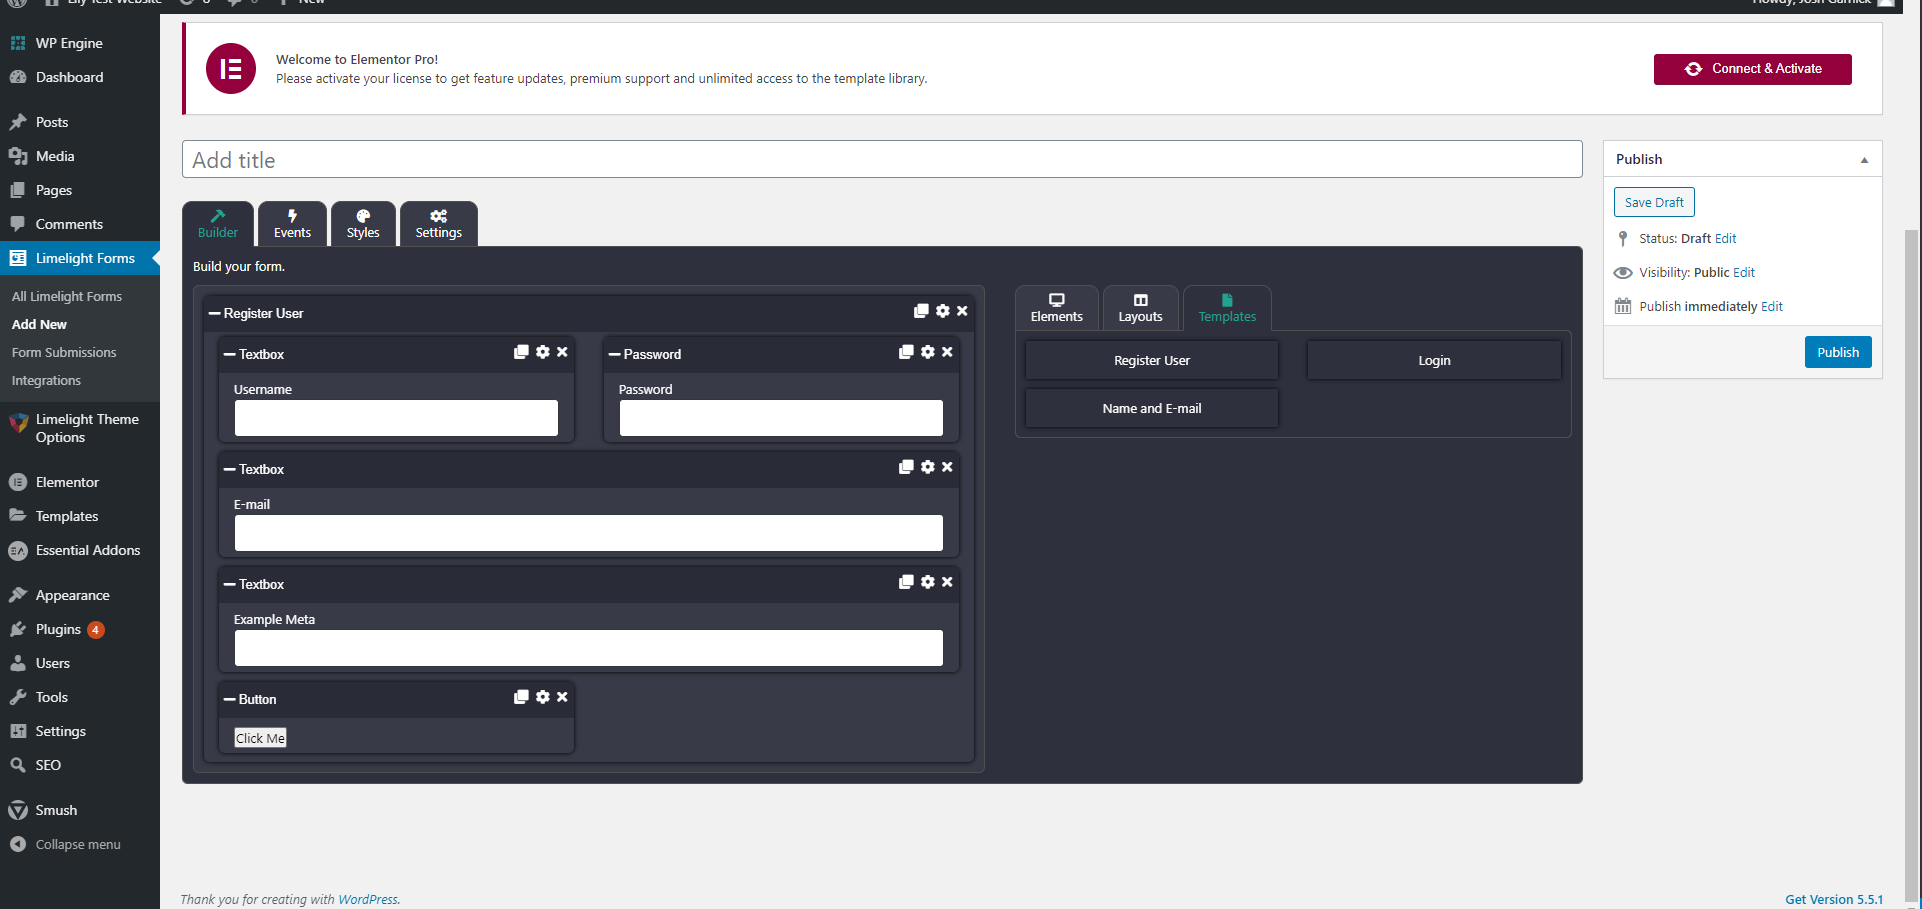
This is the first step in creating a Register User form. You’ll go to the Limelight Forms tab in your WordPress dashboard, and then click “add new.” From there, you’ll see the Templates tab on the right side, with three templates to choose from. Drag the Register User template to the left and onto the Builder section. Don’t forget to add a title too, and feel free to customize the button text.
Like we said above, these forms can be used for a variety of different options, but the core value remains the same: it gathers data or content. The “Register User” example we’re showing would be beneficial if people need to log in to your website in order to view certain information, or if you have a free product or free portion of the website that they would need to access with a username and password. For a site visitor who isn’t already registered, they would fill out this form.
Note: Another template you will probably use this same form and process for is the Login template. That way you can give your current users a Login page and a way to access their account! You’ll want to repeat this process and make a separate Login form too.
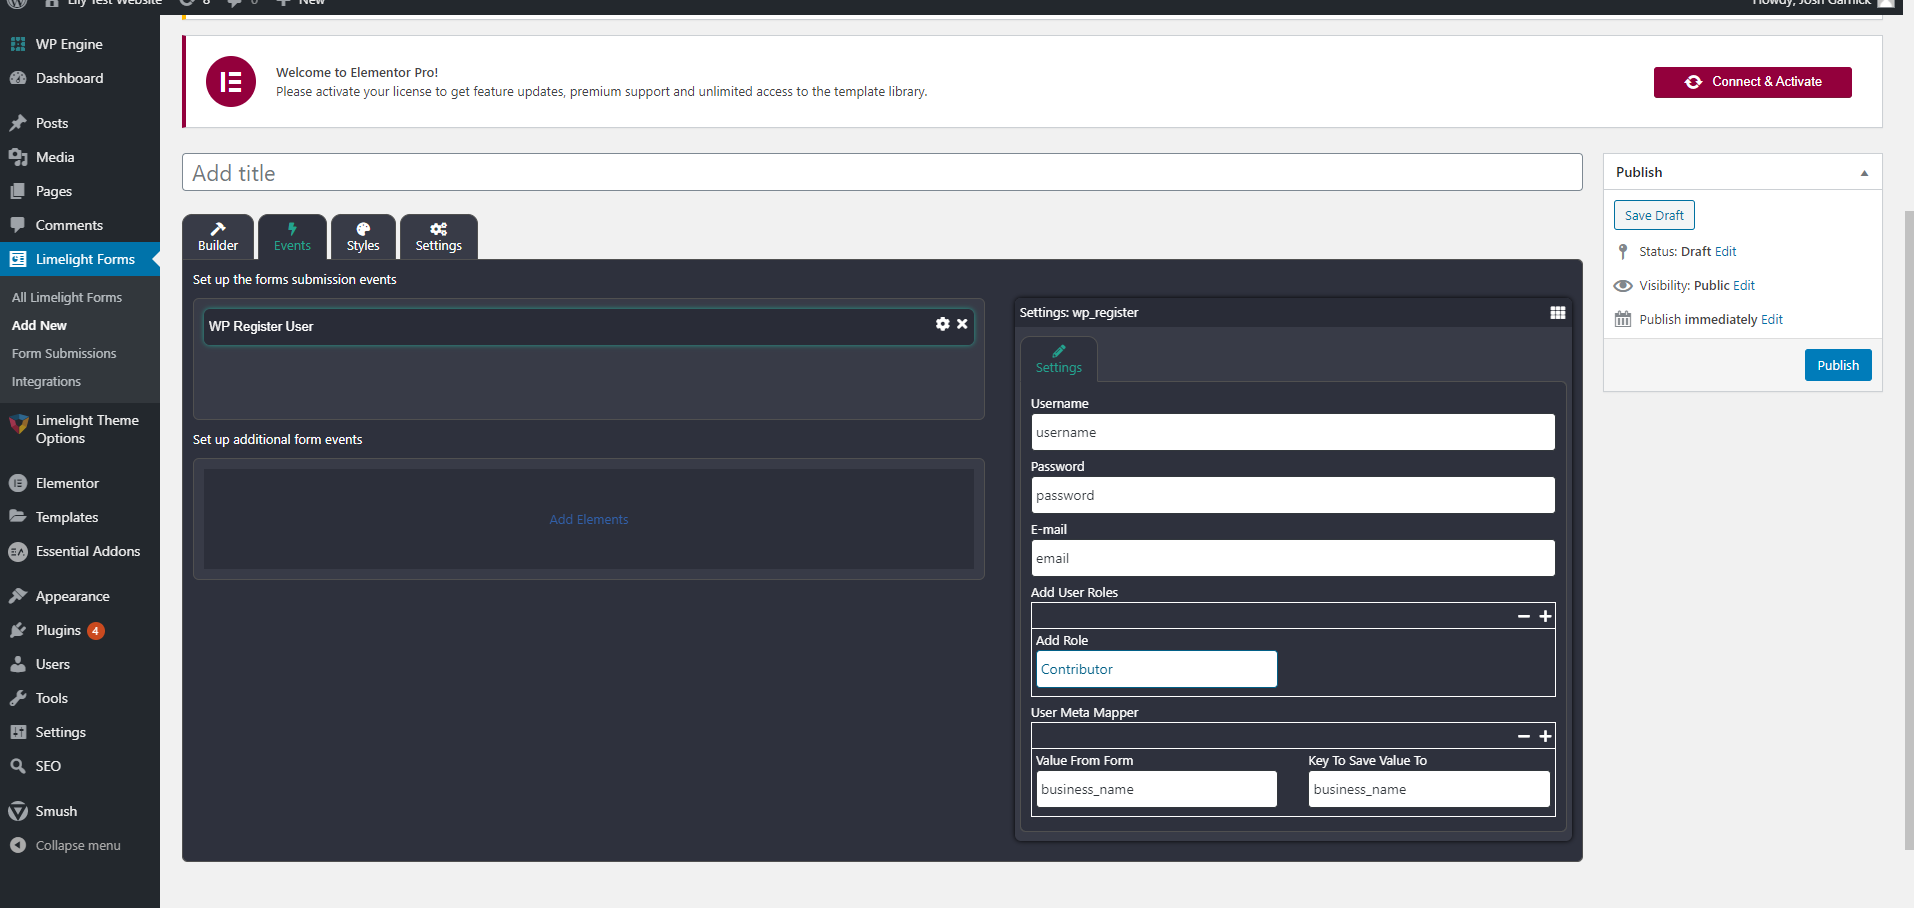
After you’ve started your Register User form, go to the Events tab on the top left. This will allow you to add different events to happen after a visitor signs up. The screenshot above specifically shows what you can change with the “WP Register User” event: in addition to getting their information, you can also automatically add new users to a specific role (such as Free Membership Level 1, etc) or even use the Meta Mapper to make sure additional information that you might add to the form (if you add additional questions/text boxes) is tracked and associated with that user, like a business name.
Note: We’ll show you how to add/change user roles later on!
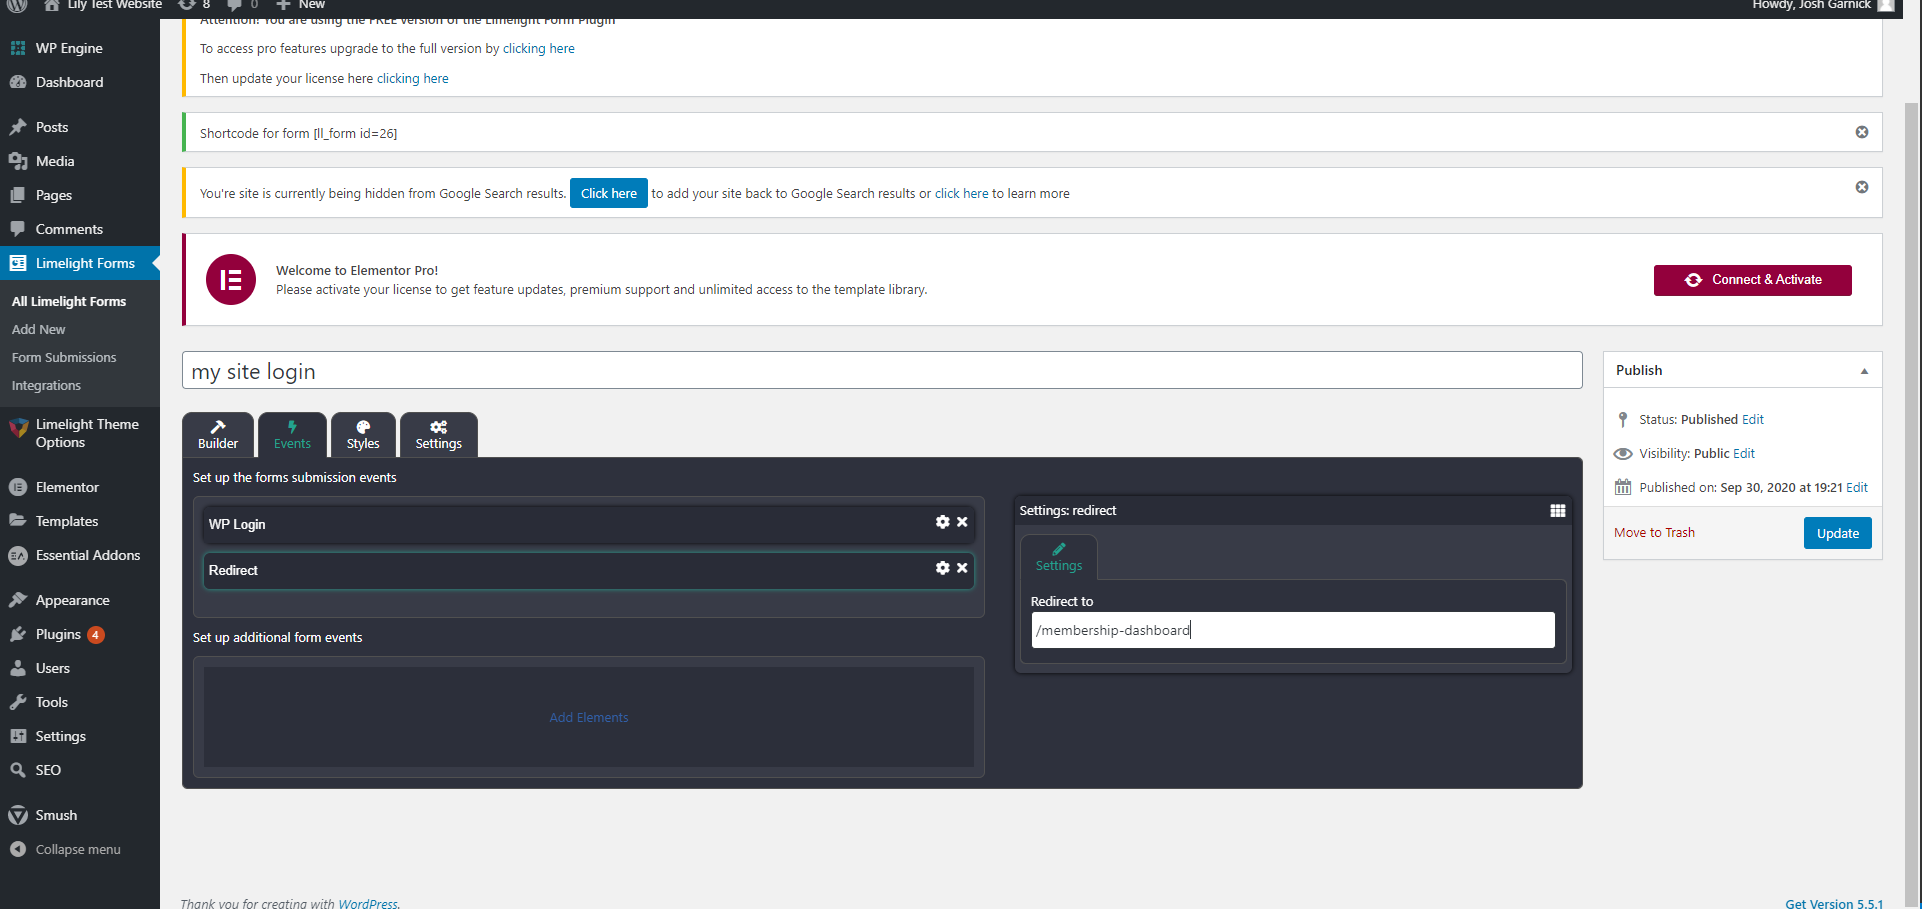
You are also able to set up a Redirect event after a user registers or logs in. To do that, you’ll go to your registration form that you created in Limelight forms, click the Events tab, and then drag and drop the “Redirect” action underneath the “WP Login” or “WP Register User” action. On the right side, you’ll be able to set which web page you want your users to be redirected to after they sign up and fill out the form. In this case, we used the example of a “Membership Dashboard” page we created for members to be redirected to after they successfully log in.
After you’ve set up the events you want to take place, you can change the style and settings of how you want your form to appear. Play around with the options and see what you think!
Once you’re done making your register user form, don’t forget to name it and save it. The form is done! We don’t have to worry about payment options or portals since this is just a regular form. (We’ll cover how to make products and payment gateways in Limelight Checkout.)
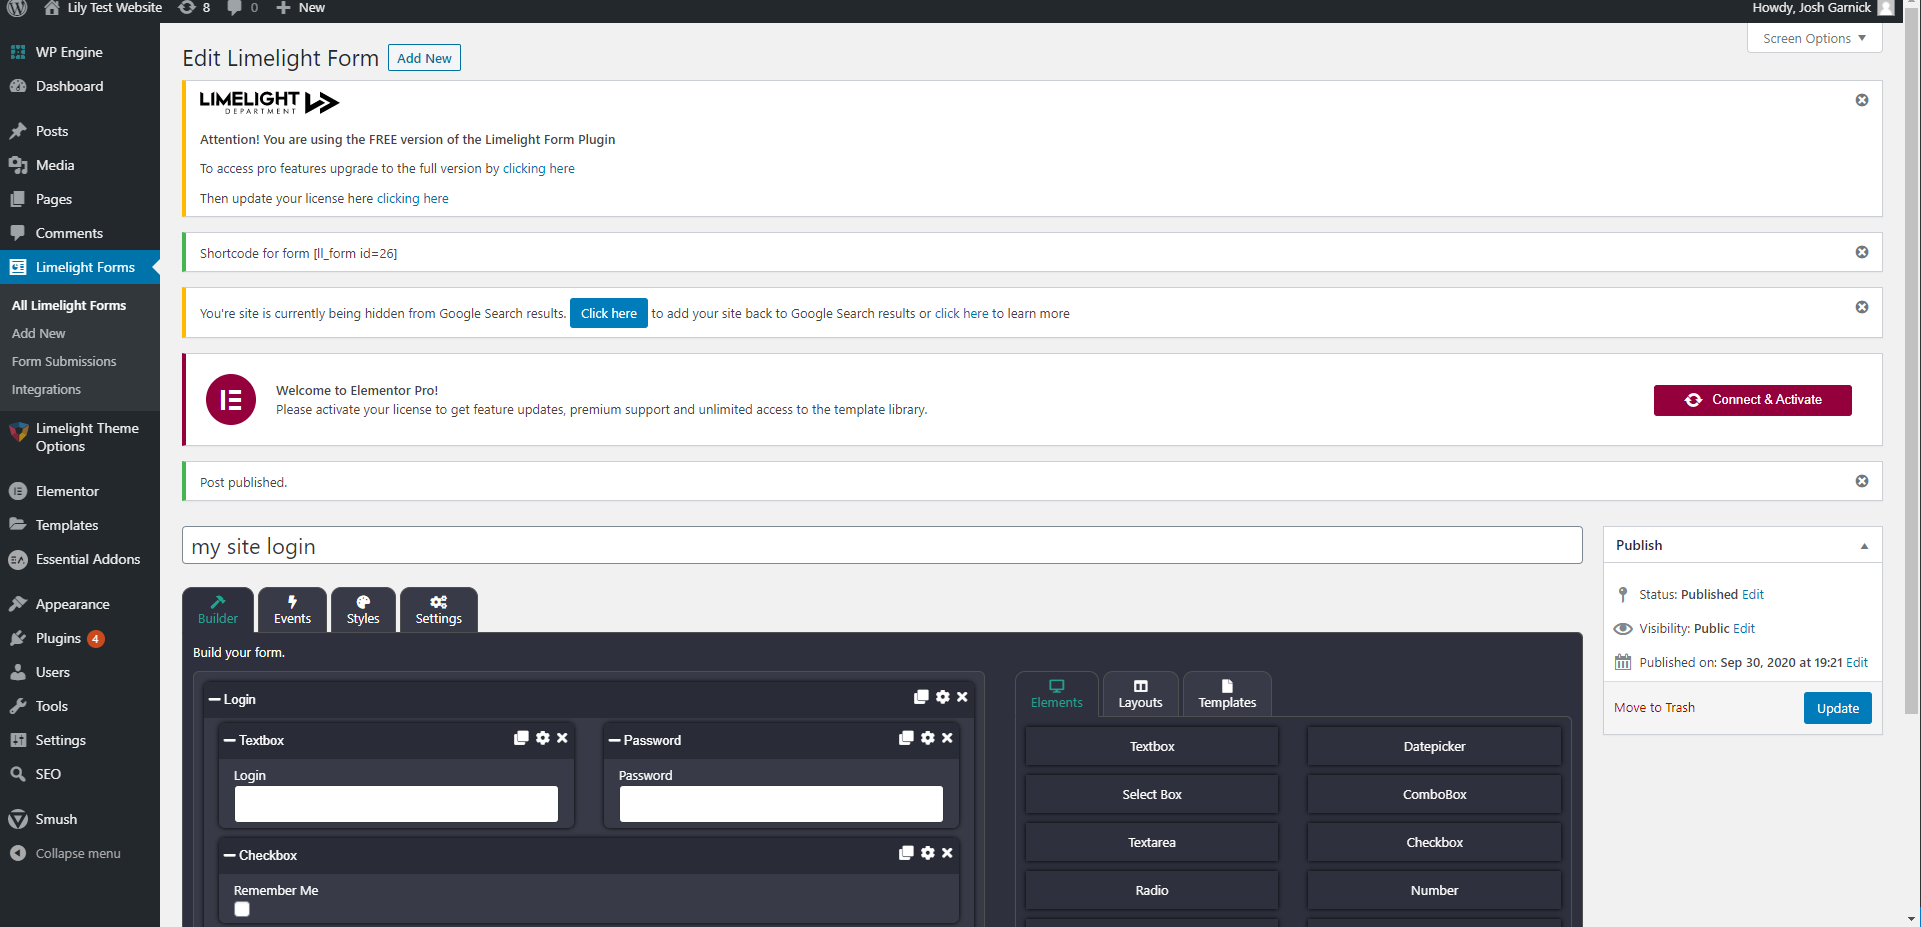
Next, we need to copy the form and paste it into the page we want to use, probably named our Register User page or our Sign In/Login page. To do that, locate the notification above the form that has the green bar on the left side that says “Shortcode.” Copy the code in brackets, and then we’ll go paste it into the page itself.
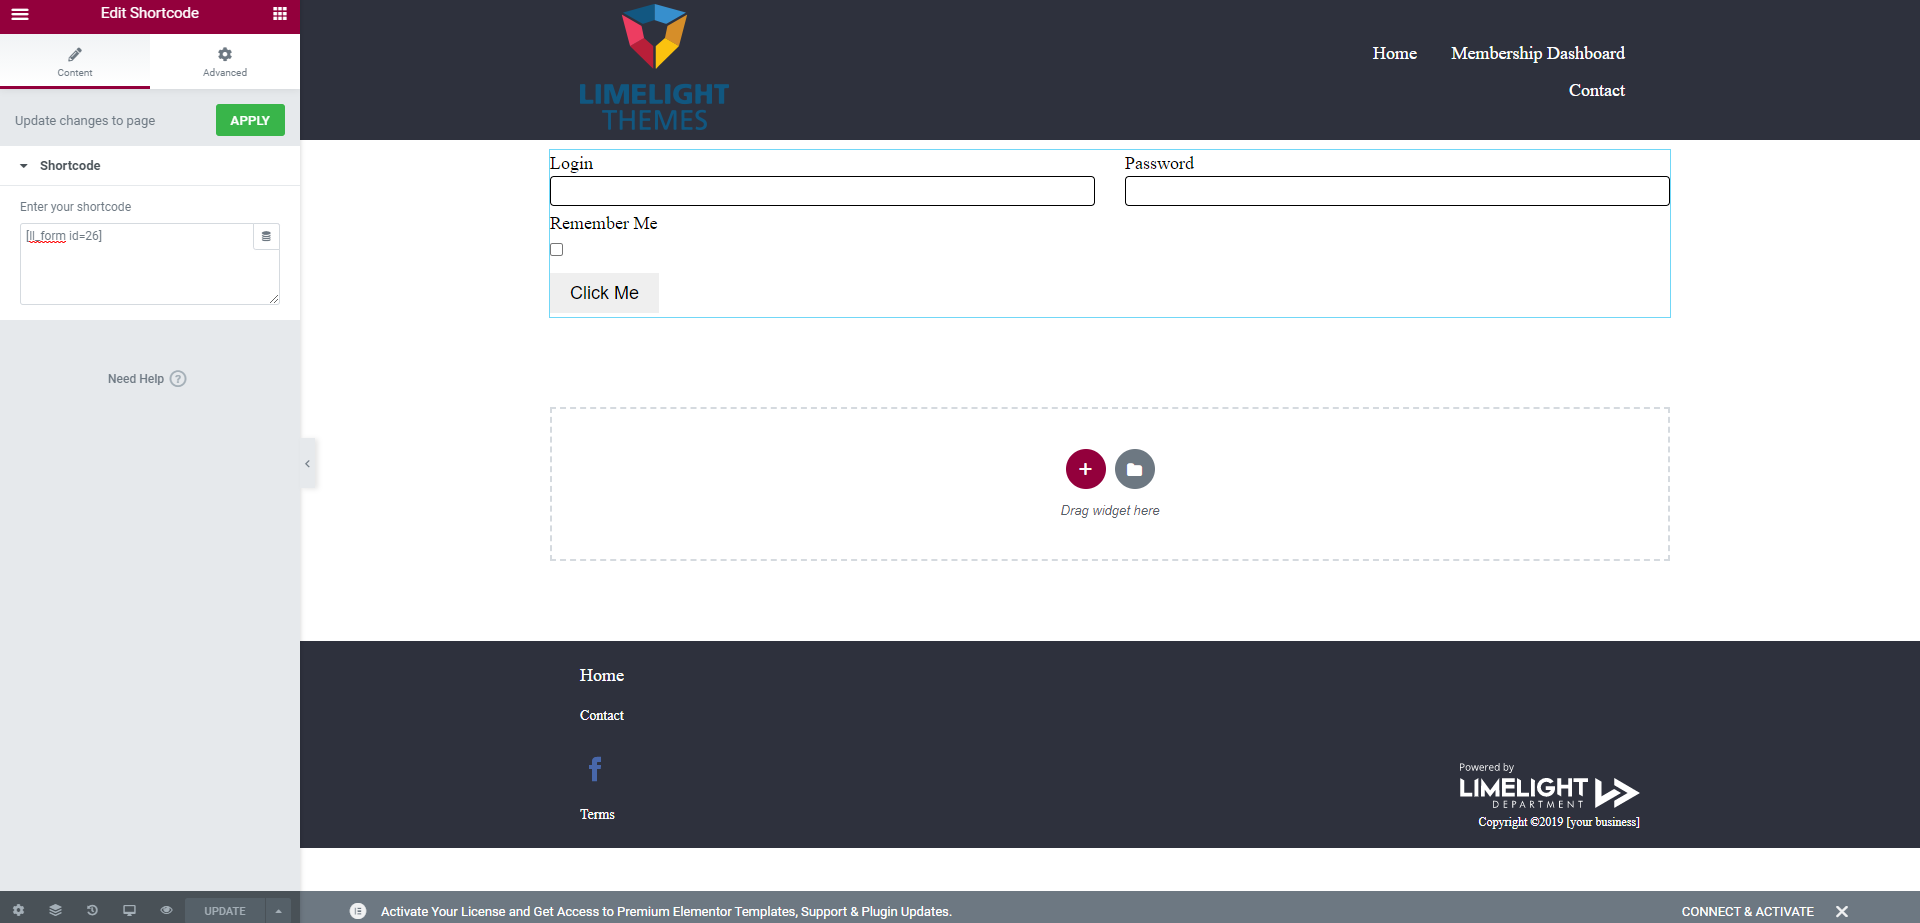
You’ll copy that code and then open up the page you want it to be on in WordPress, then click “Edit with Elementor.” Once there, choose the “shortcode” widget from the elementor list on the left side (there’s a search bar at the top). Paste your code into the box on the left, save and update, and it will show up on your page! Again, you’re more than welcome to stylize your form to make it more appealing.
That’s it! Those are the basics to create any form for a membership site, including a Register User or a Login form. There are a lot of smaller options you can play with that will change the style, structure, or what you want to include in your forms — and you’re always more than welcome to make your own form from scratch if you want, too. However, these pre-made templates should serve you very well for your membership site and save you some time in the process.
Membership Purchases with Limelight Checkout
Now, the Limelight Forms might be handy for giving members access to services or products without a payment, but what about when you want to charge them for a specific level of membership, like a basic or pro level, or even have a free trial period before they’re billed?
That’s where Limelight Checkout comes in.
The Checkout plugin is also included in the theme bundle, and can help you set up multiple products, tiers of memberships, payment types, and more. It’s also very handy in setting up events after a visitor purchase, such as sending a welcome email or even changing a user’s status from a free user to a paid member.
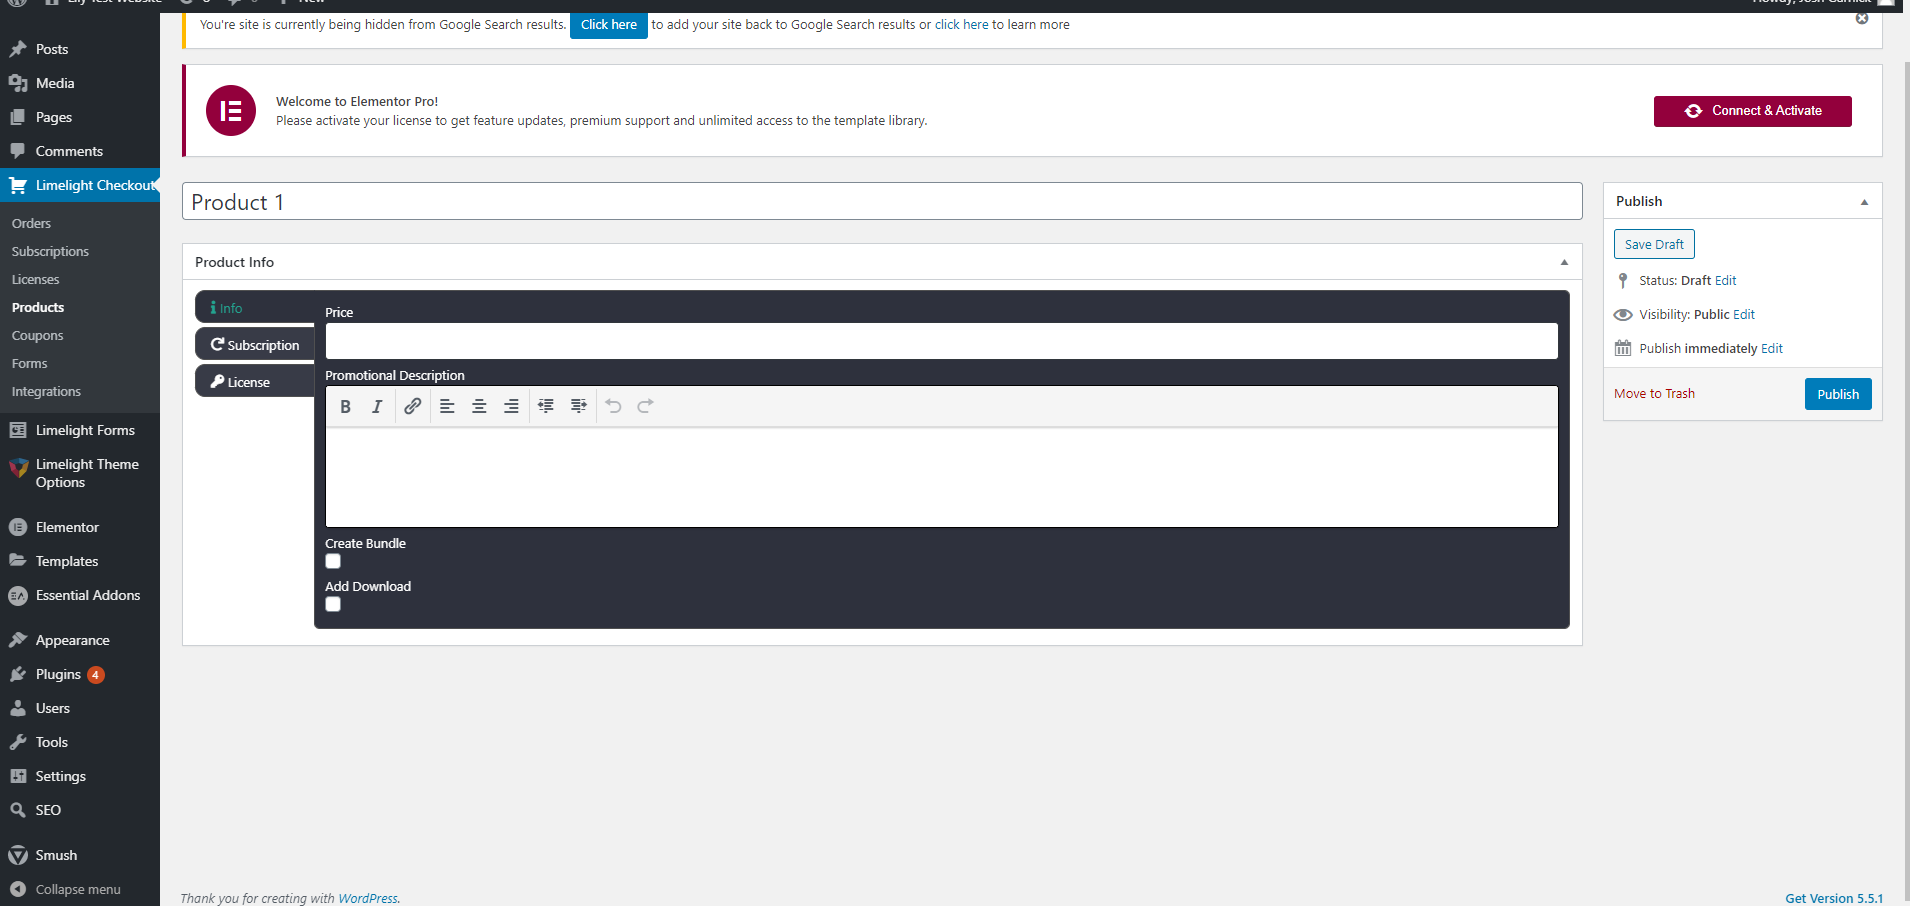
If your membership has to have a payment option, or even has different levels of payment options, then Limelight Checkout is where you’ll go. The first thing to do is create products to match your membership tiers or offers. If there are three paid membership options, make sure to create three different products. Under Limelight Checkout on the left side of the WordPress dashboard, you’ll go to the Products tab. Here you’ll be able to add a new product, name your product, set the price, and add a description. If your product is offered as downloadable content, you can click the “Add Download” button to add it.

The second tab under Products is for Subscriptions, and it’s where you’ll be able to set any and all subscription requirements and time frames. This includes trial periods, maximum billing periods, month to month memberships, and more.
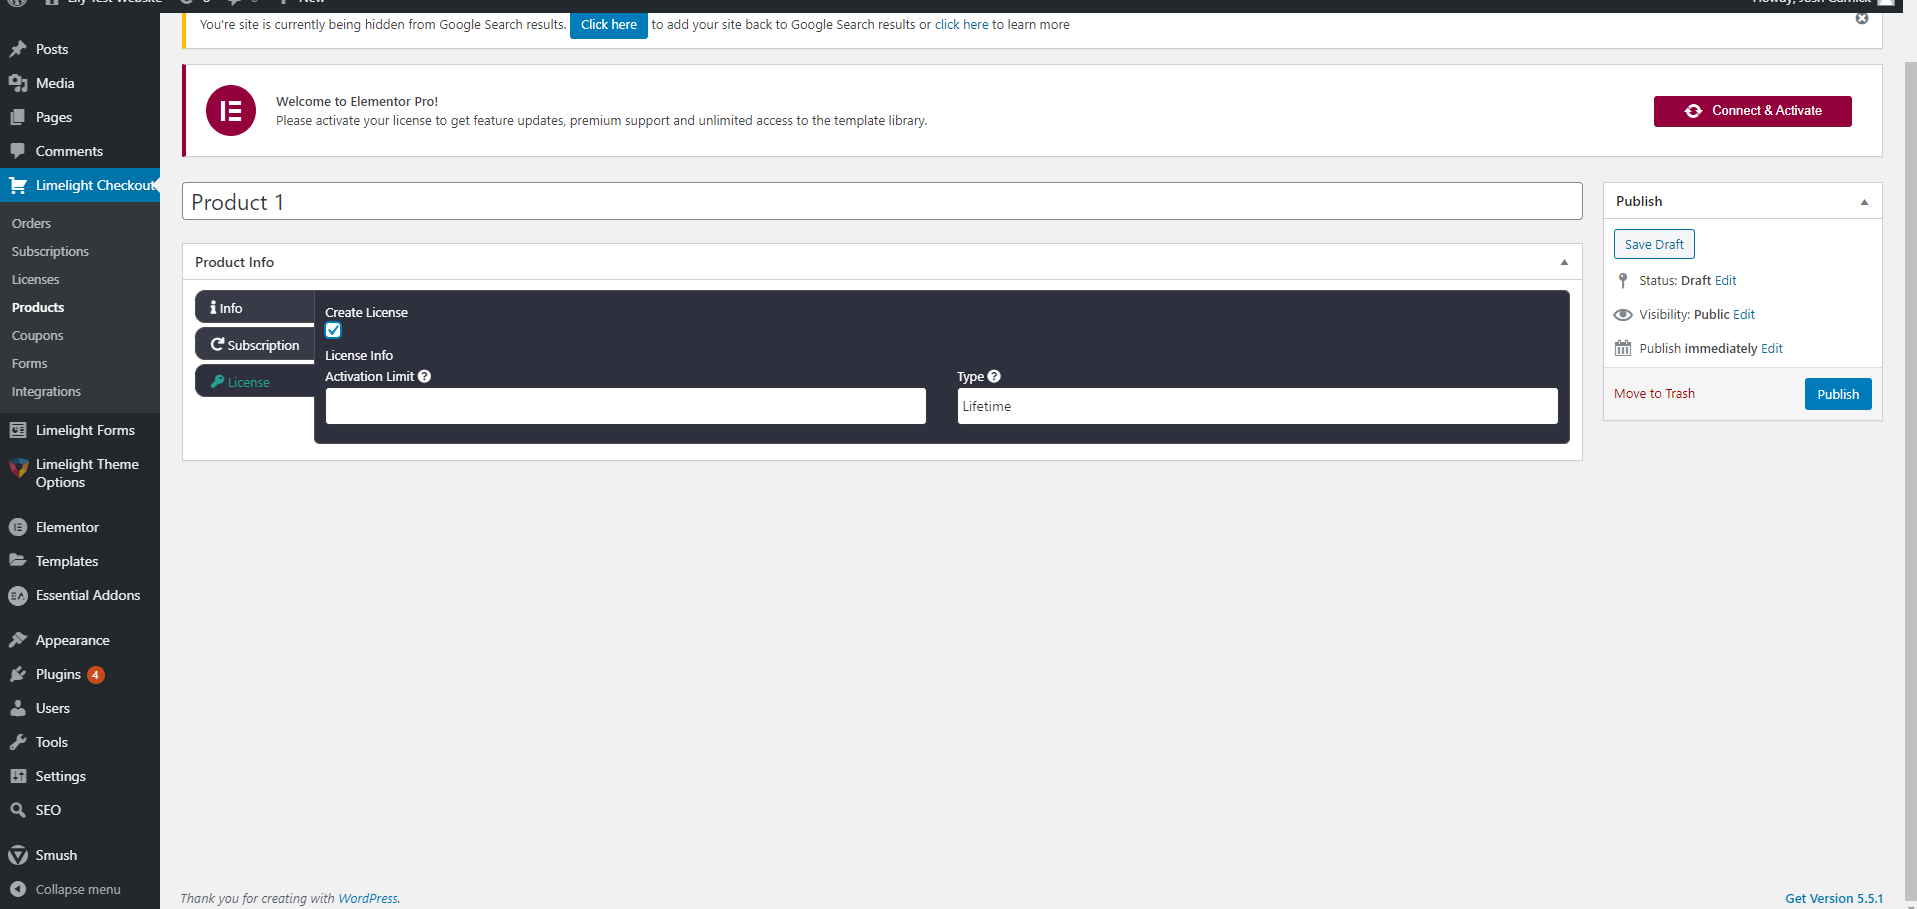
The third tab is simply to add License Keys. This would be if you want someone to have to input a code to ensure the product is only used once. You’re able to add limitations and even state what type of license it is, like if they only have the license for a single year or if purchasing once gives them lifetime access.
Once you’re done setting up your products, don’t forget to name them! For different levels of memberships, it could look similar to a Basic level, a Pro level, and a Max level. After you’ve named them just remember to save.
After you’ve created your membership products, you’ll have to create a separate Purchase/Checkout form for each membership. This will be different from the Register User form, since there is a payment attached; the purchasing form will be much more detailed and also take credit card information.
To create your sign up form, you’ll go to the Limelight Checkout tab on your WordPress dashboard, then underneath it click the Forms tab. Make sure you’re looking at the Forms tab under Limelight Checkout, and not under Limelight Forms! Then click the “Add New” button at the top of the page.
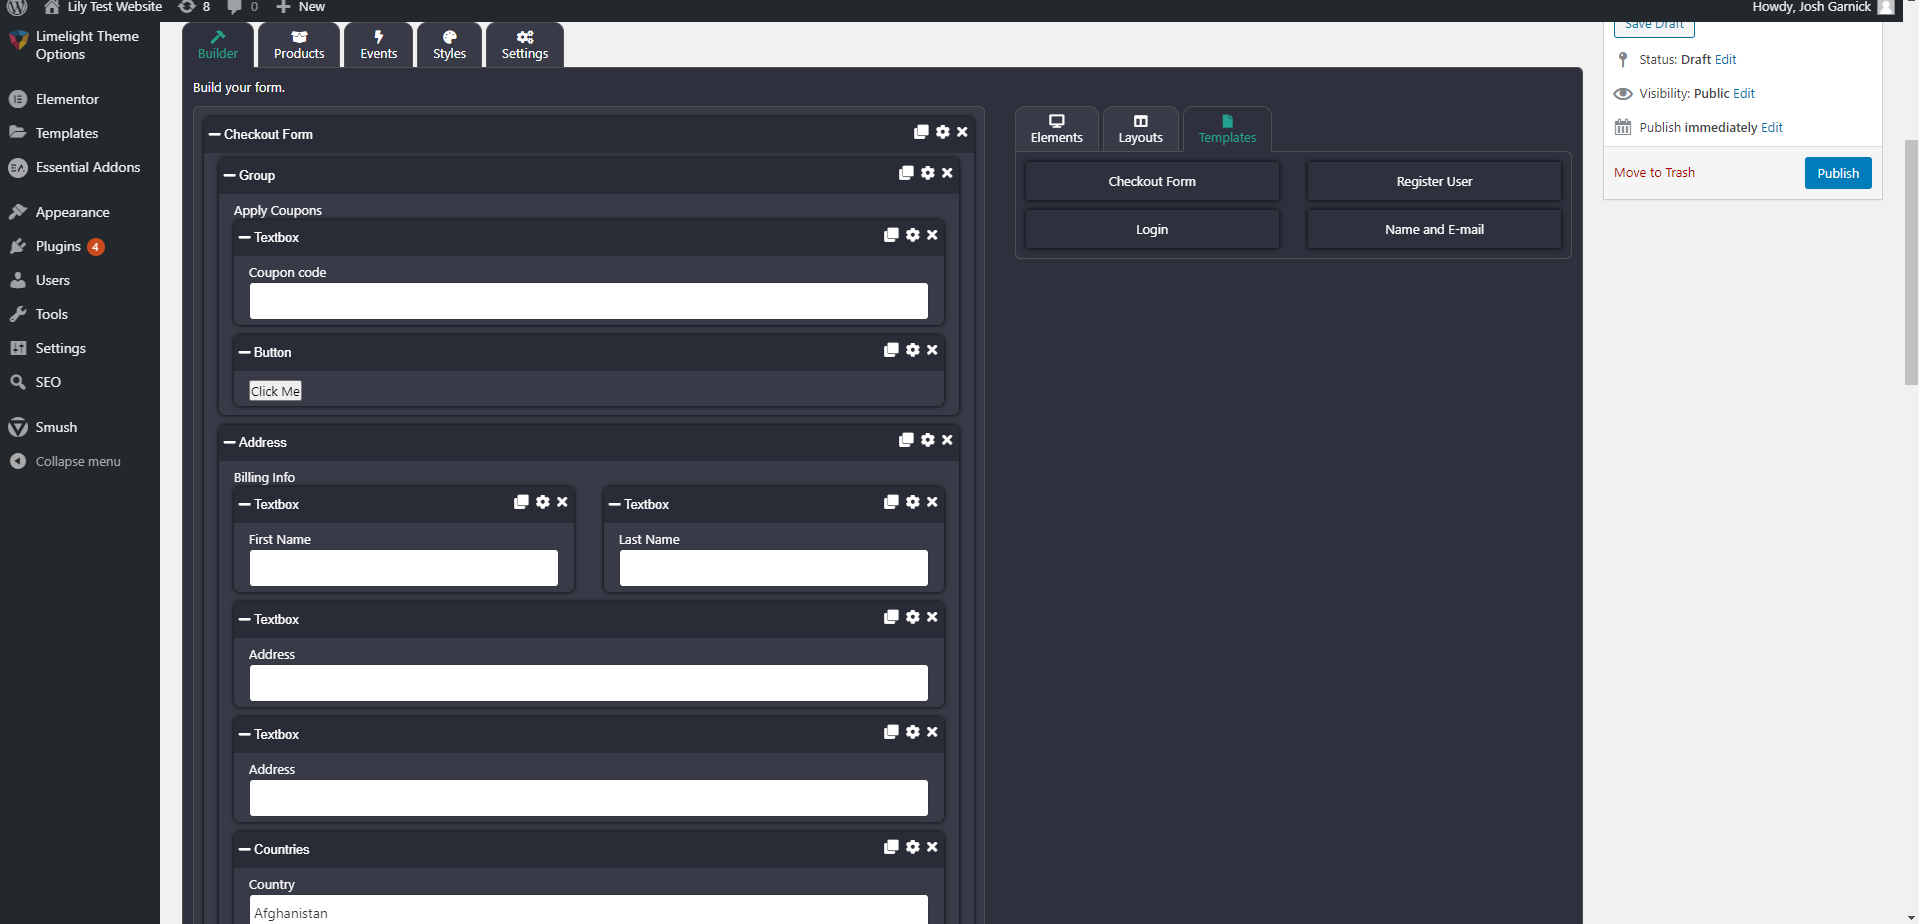
To start your purchase form, click the Templates tab on the right hand side, and then drag and drop the premade “Checkout Form” template to the left side of the form builder. The form that pops up is all ready to go, with card payment options and everything.
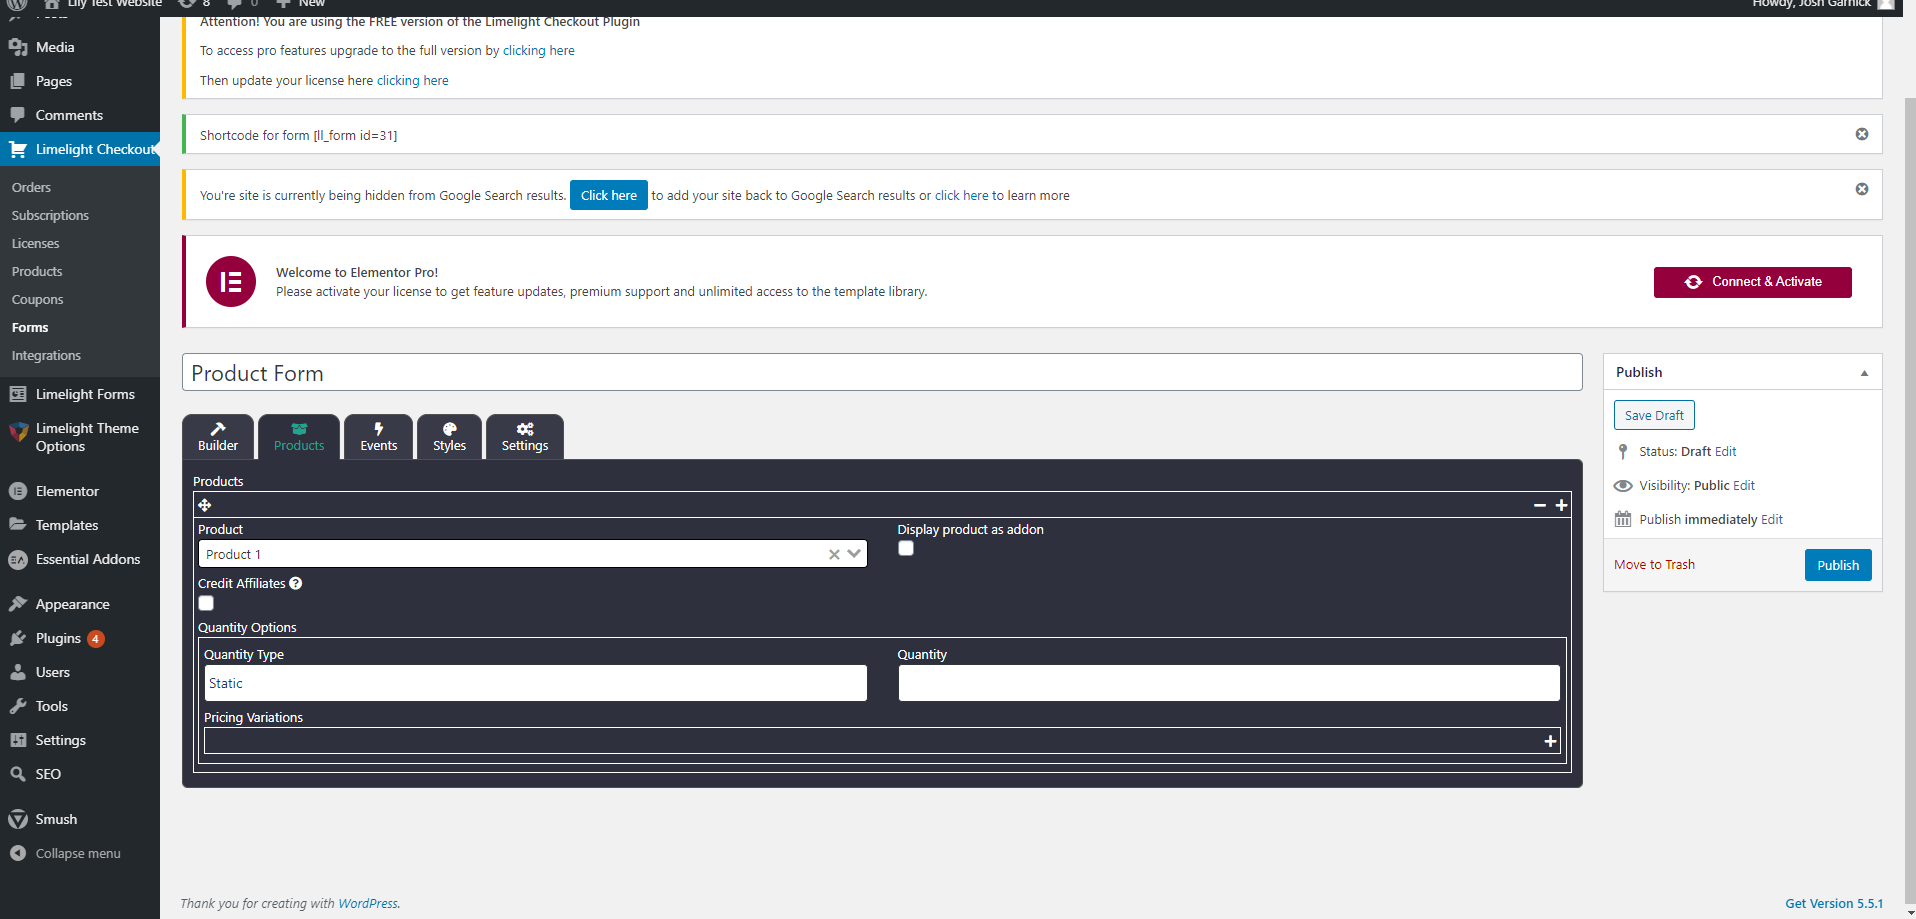
Now it’s time to add our product. On the second tab of the Form Builder, you’ll see Products. Once you’ve made your different products you should be able to choose the one you want from the product list.
Most memberships probably aren’t ordered in bulk (meaning only one is purchased at a time), so don’t worry about the Quantity Type field or anything else on the page.
Remember: Each membership type will have to have its own separate form! So if you have three memberships, make three different forms with different products. They’ll go in different places on your website to correspond to your membership options!
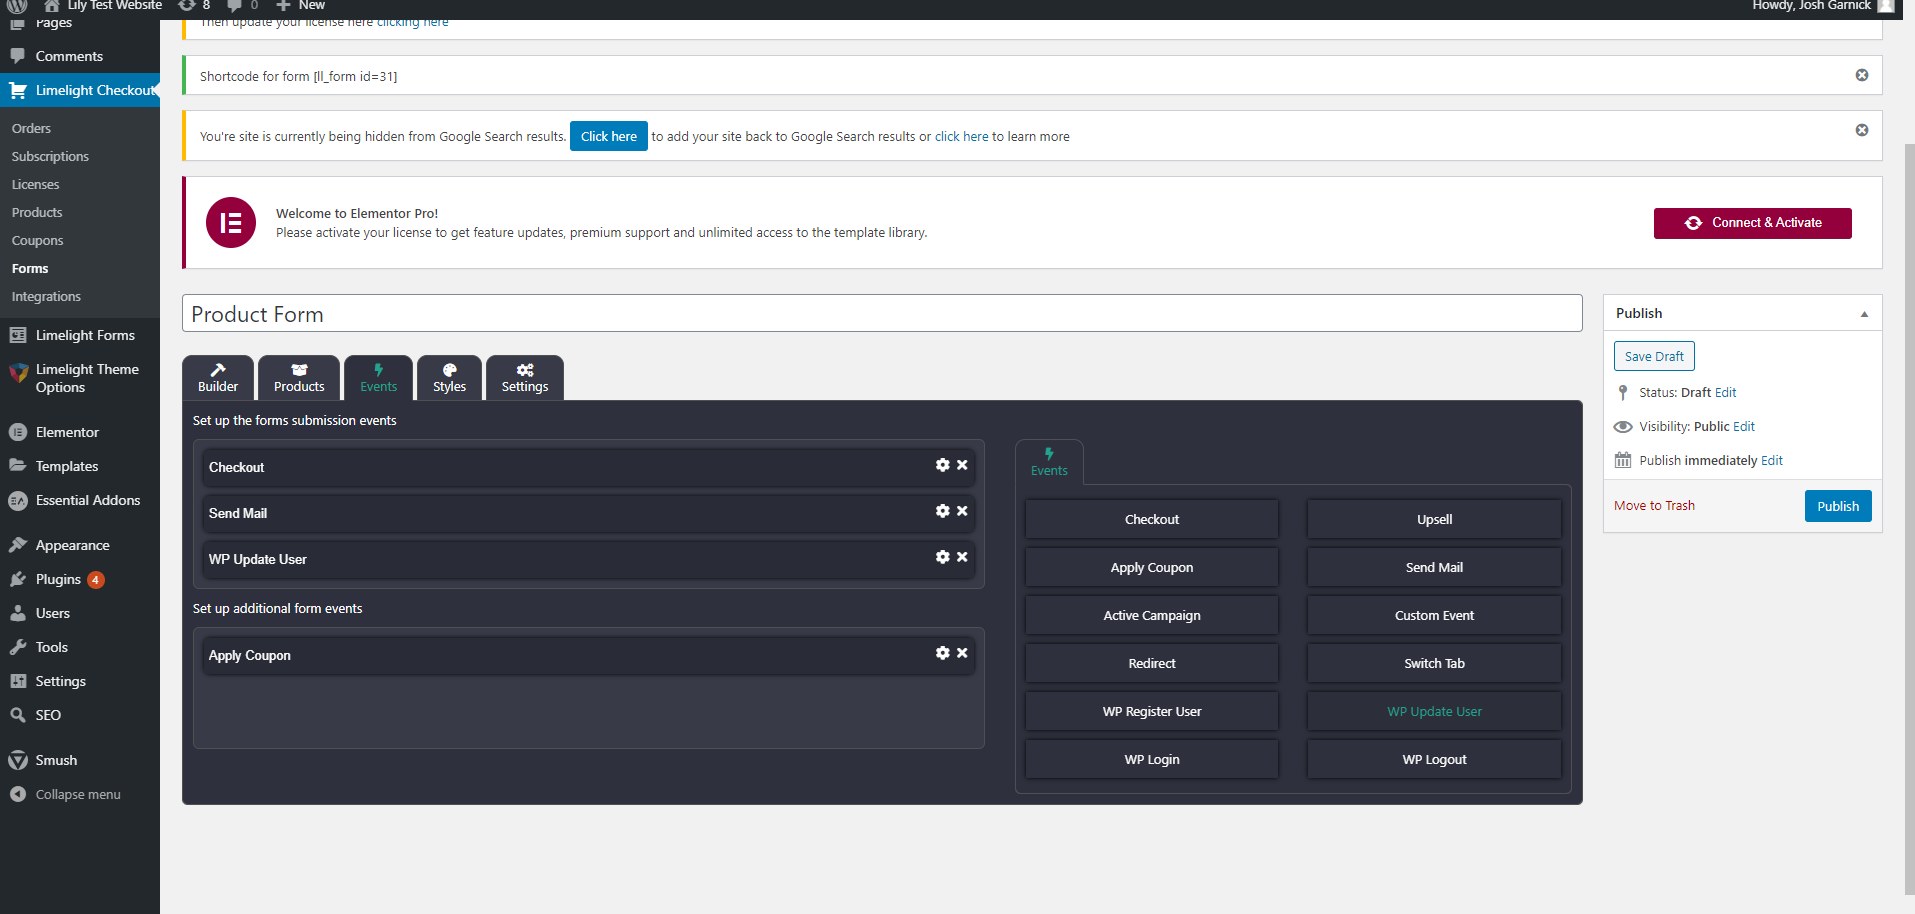
The next tab on the Purchase form is the Events tab. This is pretty similar to the Events tab with the Limelight Forms that we talked about before — it’s where you’ll make sure that you have events set up to happen after the customer officially signs up and purchases your membership.
Feel free to add whatever you’d like to this page, which includes coupons, thank you emails, and more. Just like on the Limelight Forms too, one super handy option that you shouldn’t forget to change is the “WP Update User” action. It isn’t automatically added after a checkout process like it is when someone registers, so you’ll have to add it manually if you want to use it.
If you drag and drop this action to the left, it will allow you to change a User’s role/status on your website. But what does that do, and why is it even more beneficial after a customer actually purchases a membership?
As an example, if you have someone who was originally a registered user (or even just a non-user, regular site visitor) who chooses to sign up for the 2nd level membership, you can make sure that after they sign up, they will be switched from a “free user/no user/level 1 member” to a “2nd level member,” which will give them access to all of the content for 2nd level members. (We’ll cover accessing and restricting content for different levels in the next section — almost there!).
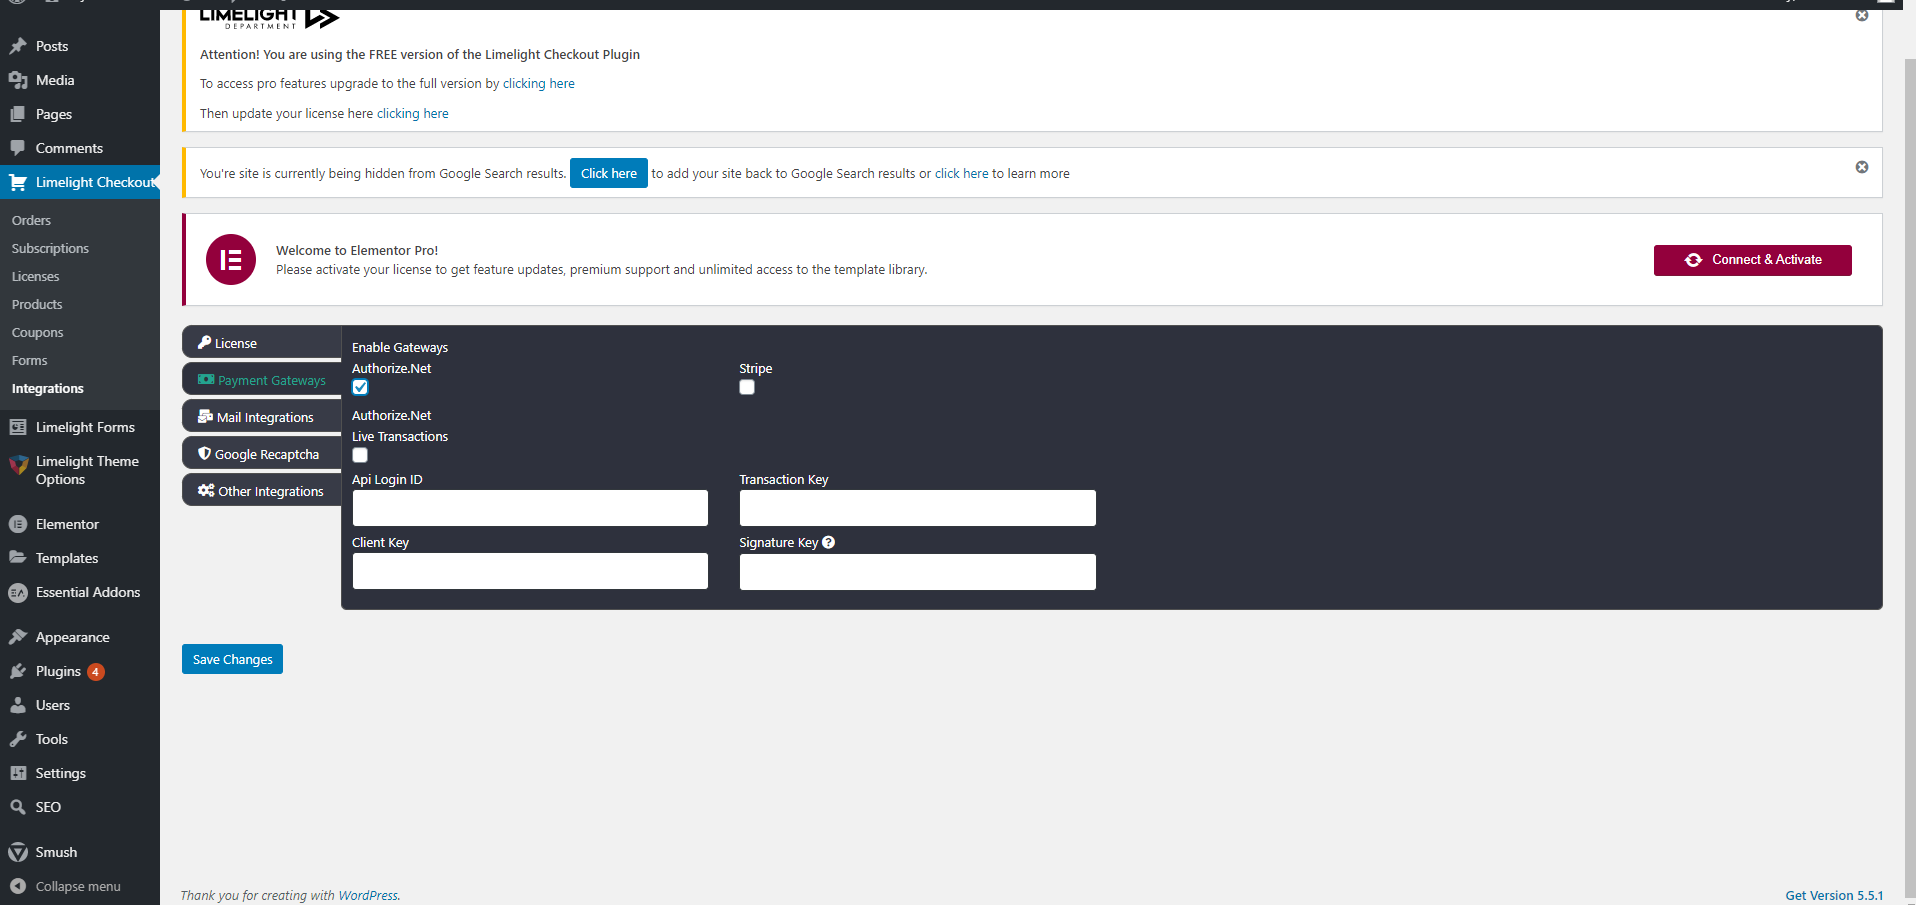
The last thing you have to make sure to set up before your forms will be live and ready to use are the payments. To activate your membership forms, you’ll go to the “Integrations” tab under the Limelight Checkout option in the WordPress Dashboard.
From there, you can set up a variety of different options depending on your preference. The main one to remember is to go to “Payment Gateways” and choose which payment options you would like to use.
The Limelight Theme offers integrations with both Authorize.net and Stripe; you can use both or one or the other, just make sure to make a free account on the service’s website so you can track the number of memberships you sell and actually get paid!
All that’s left: make sure to save your changes. Your checkout forms are done! From here it’s just as simple as copying and pasting the shortcode into an elementor page block like we talked about before in the Limelight Forms section. Don’t forget to customize and style your checkout form too!
Restricting Access to Certain Pages or Content
Another very important part of your membership website might likely be to have some content available for certain levels of members but not others. Luckily, the Limelight Theme includes custom-made settings and integrations that will allow you to control user access and restrictions.
As mentioned a few times previously, part of that is through creating corresponding user roles that match up with the different tiers of your membership. Once you’ve created the different roles, you can change the access to your website, pages, and content in several different ways.
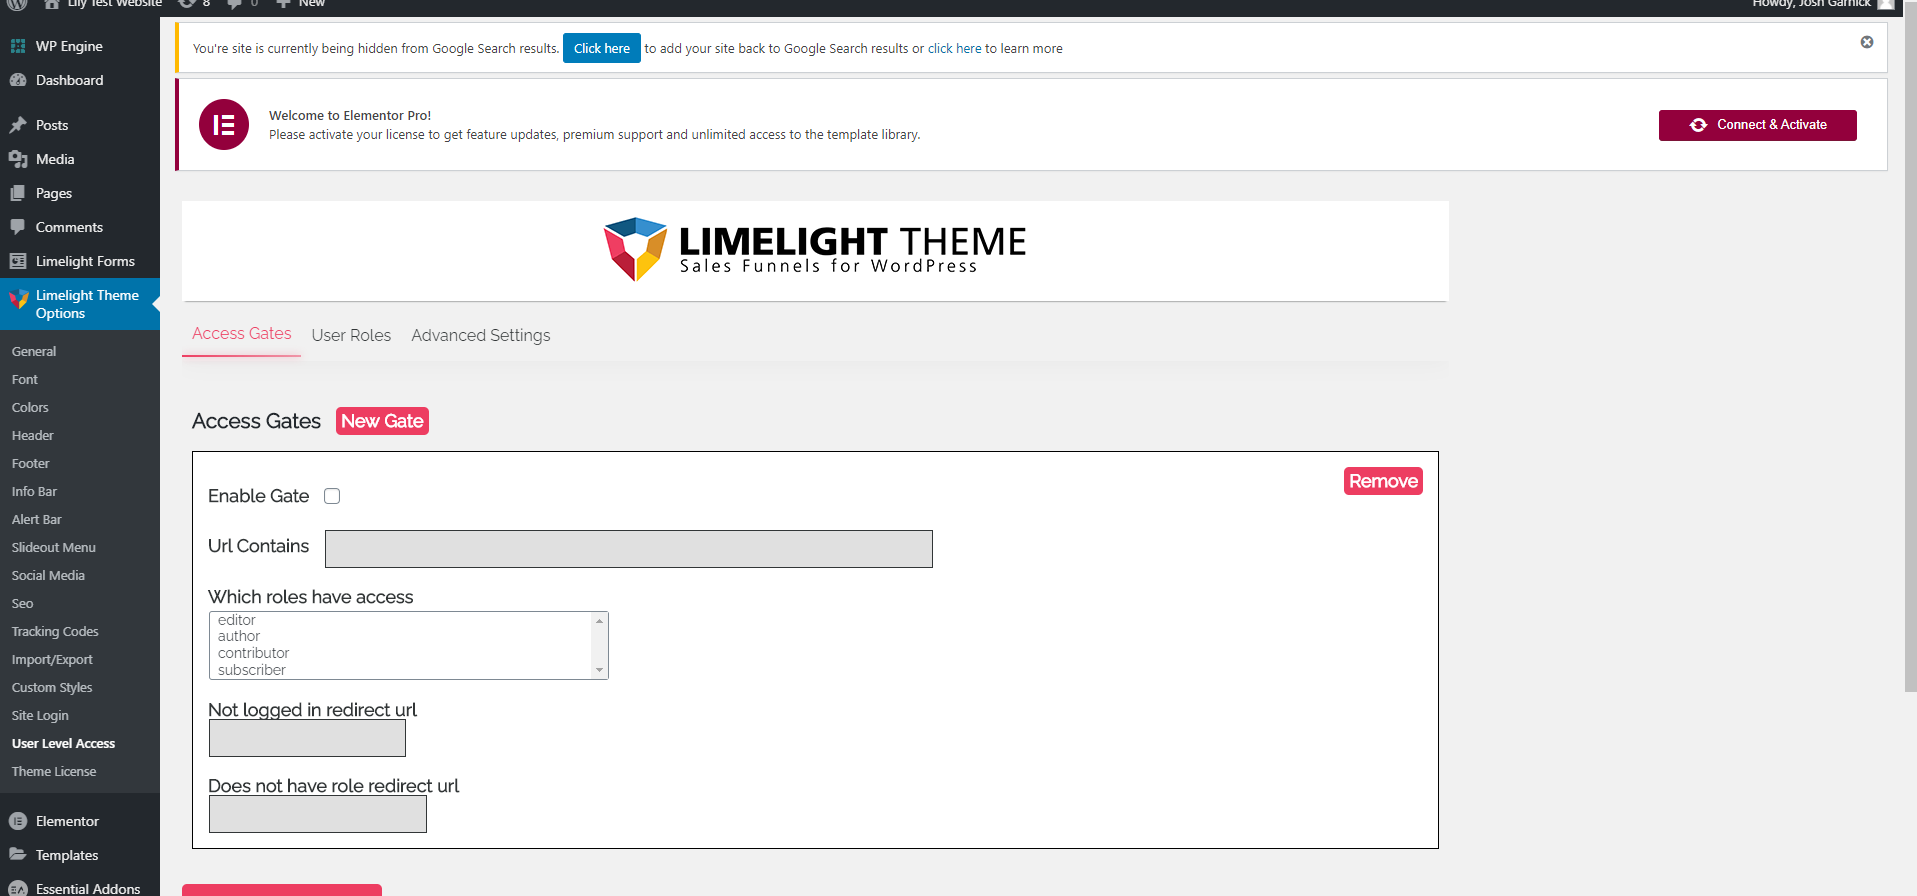
If you want to restrict website access to regular site visitors on a broader scale rather than just a page here or there — which is useful if you have lots of members-only content spread across multiple sections or pages — you can use the global settings in the Limelight Theme to restrict all pages that include certain words in the URL. For example, if all of your memberships offer different types of classes, videos, downloadable content, or even information like articles or links, you can make sure that each URL has the word “membership” in it. Then, you’d make sure that non-members are restricted from all web pages with the word “membership” in it.
It would look something like this:
Site name: mysite.com
Restricted access:
/membership
So, if you have multiple pages that offer content you don’t want a non-paying user to see, then you would make sure to have each specific page contain the word “membership.”
Your members-only videos could look like this:
mysite.com/membership/videos
Or your members-only downloadable content could look like this:
mysite.com/membership/downloads
This will ensure that someone has to log in to view that particular content. You’ll also notice you can set redirect links if someone is not a member, or not the correct type of member (like if they need level 3 access instead of just level 2). You could paste the “register now” page URL into the field for non-members to be redirected to, and you could paste the “sign up” page URL into the field for members who aren’t high up enough yet.
You’re also able to create multiple access gates, which is handy for having tiered content for different levels of members — the content can just become more and more restricted depending on the user role. After you’ve set up your restrictions the way you want, just make sure you enable the gate.
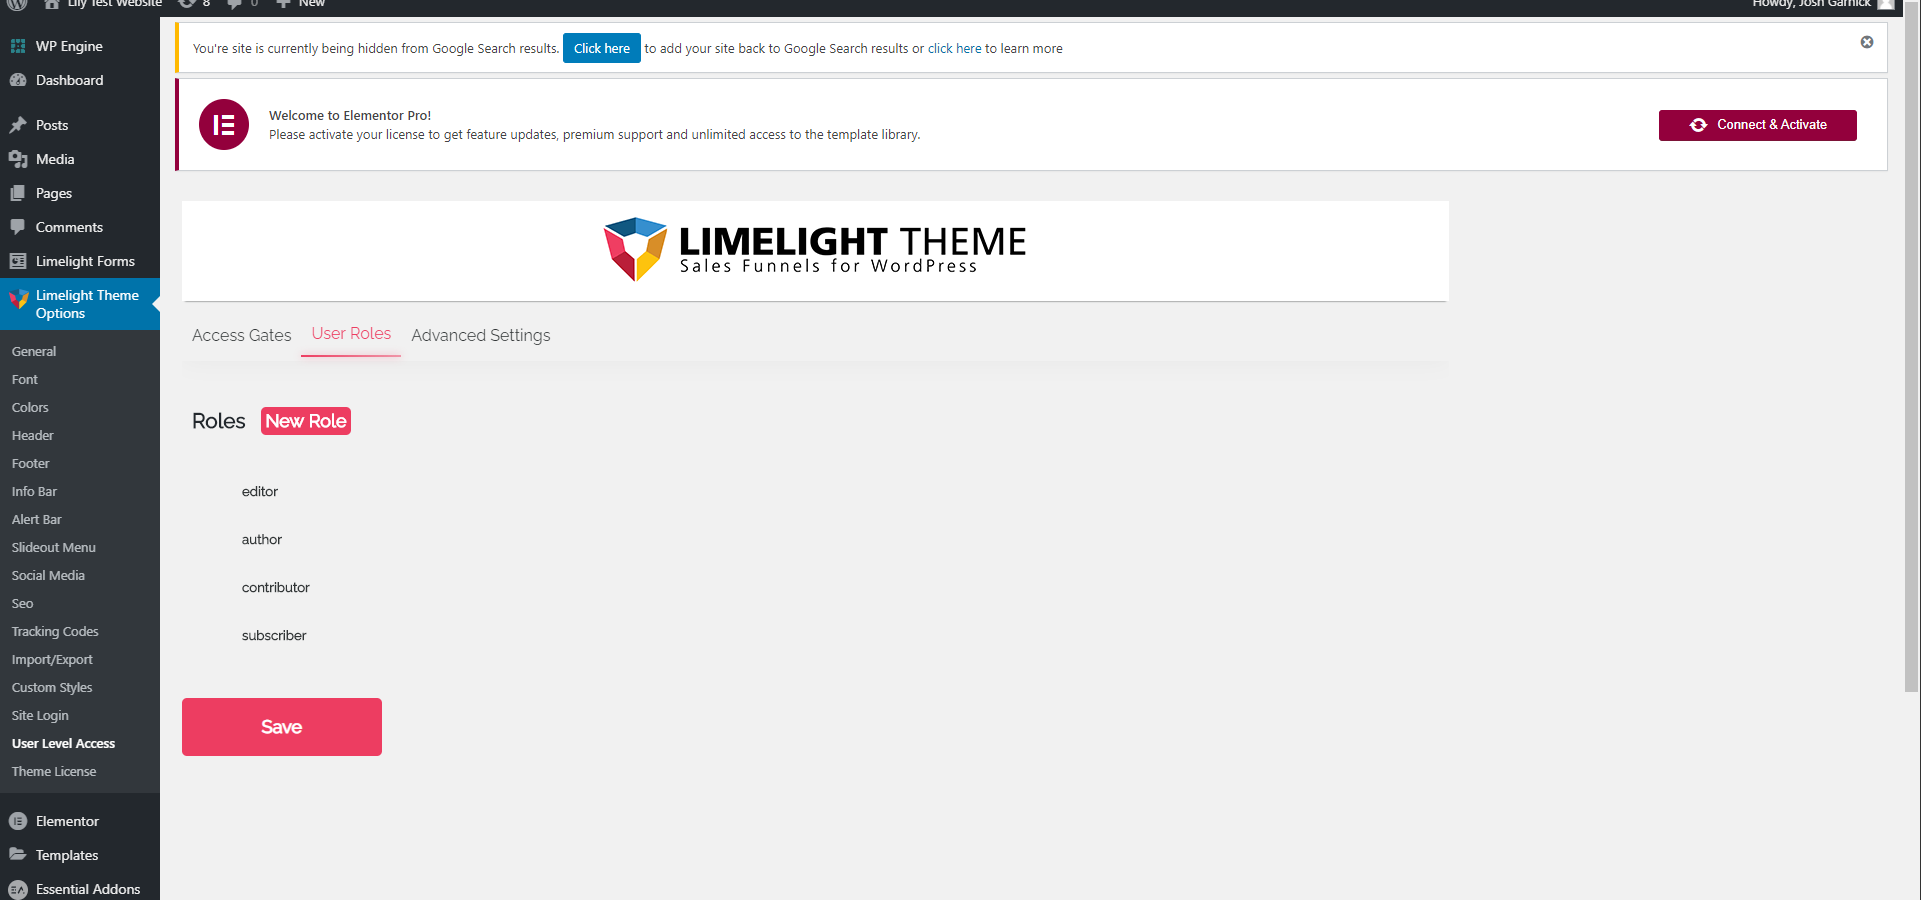
The second tab under the Limelight Theme options is “User Roles.” This is where you can view the different types of roles that are available for users, and also where you can add new ones. If you have multiple memberships, like a Basic, Pro, and Max level, this is where you could add those three roles.
Then, you can play around with the restrictions so only Max level users can access everything on the website, Pro members can only access some content, and so on.
Once you’ve already set up the different user roles, you also have the ability to make a page have a “parent page.” This will allow you make sure that the only people who have access to this new page are people who also have access to the parent page.
Here’s an example of how it would work:
If a member taking online courses has access to a “Membership Dashboard” page with overall content about their courses, they might also have access to a separate page called “Supplemental Videos.” On the top navigation, they might see a link to the “Membership Dashboard page” with a drop down menu underneath it with a section labeled “Supplemental Videos,” triggered when the member hovers their mouse over the dashboard link.
If a site visitor who is NOT a member goes to the site and the “Membership Dashboard” page is hidden, then the “Supplemental Videos” page will also be hidden.
How to access it:
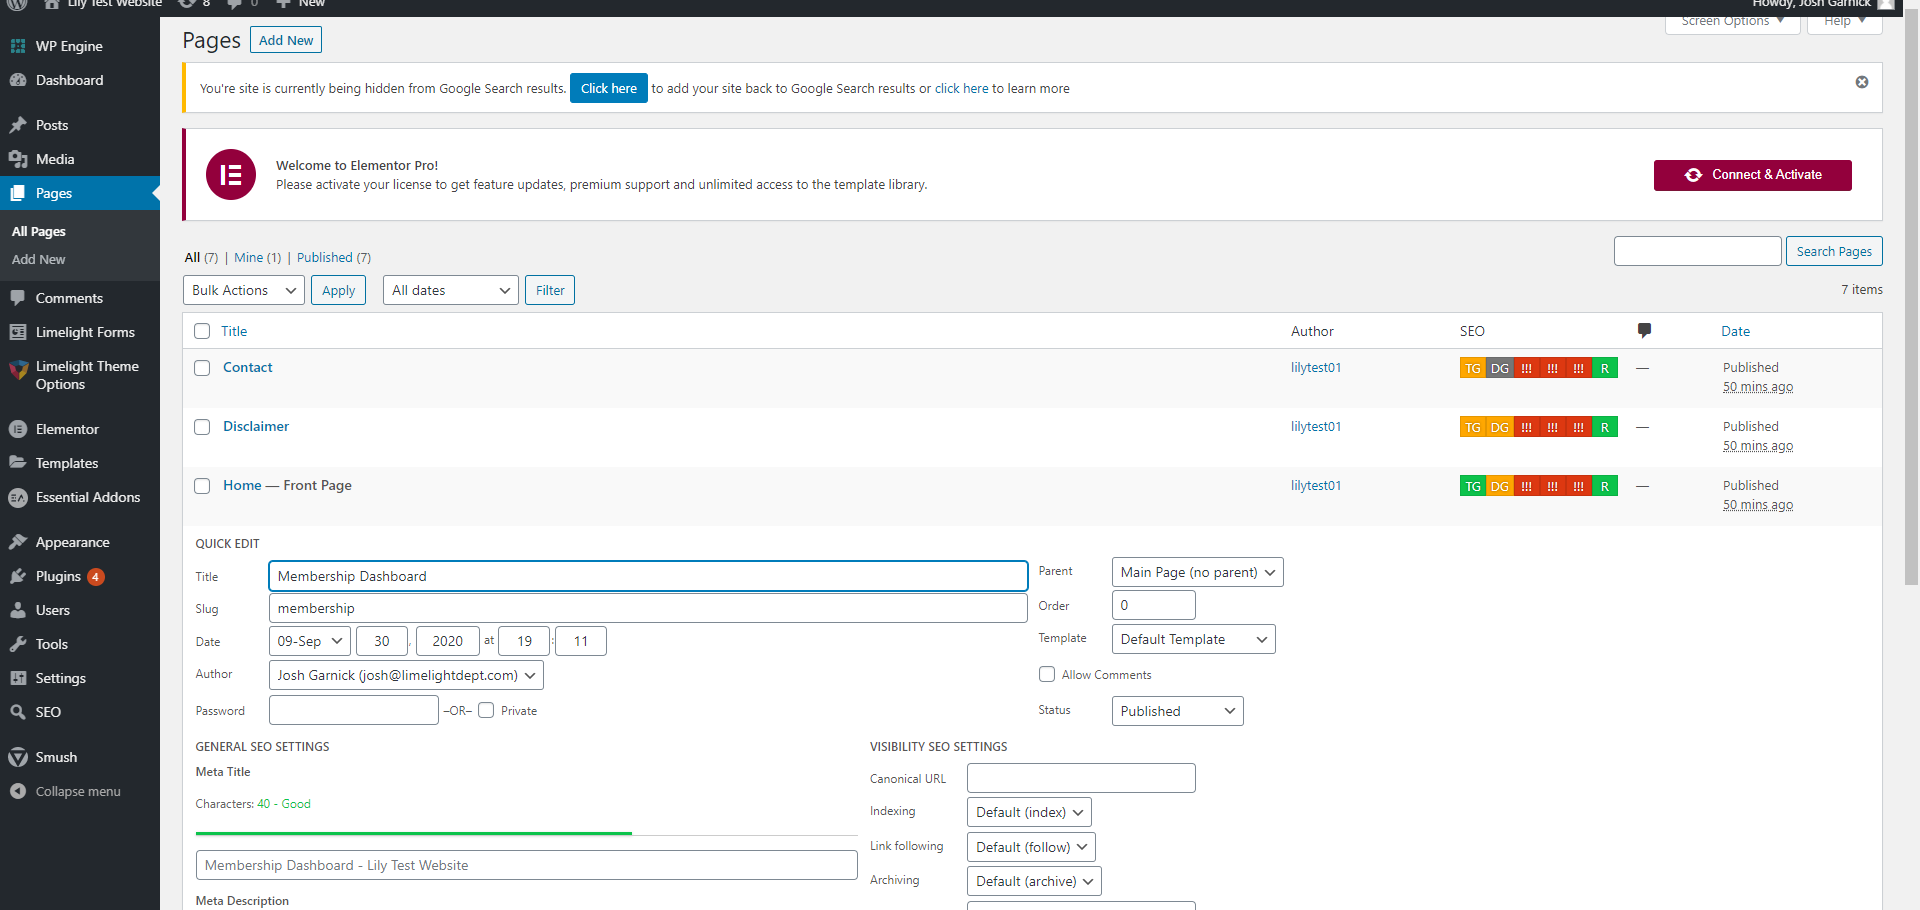
On the pages tab of the WordPress dashboard, you can click the “Quick Edit” button underneath the page that you want to change. From there you’ll notice that on the right side there’s a settings box labeled “Parent,” with different pages to choose from. From there, choose the page you want, and choose the user role the viewer must have to see the page. Ta da! That’s how you create a hierarchy of parent and child pages to restrict content from users who aren’t supposed to have access.
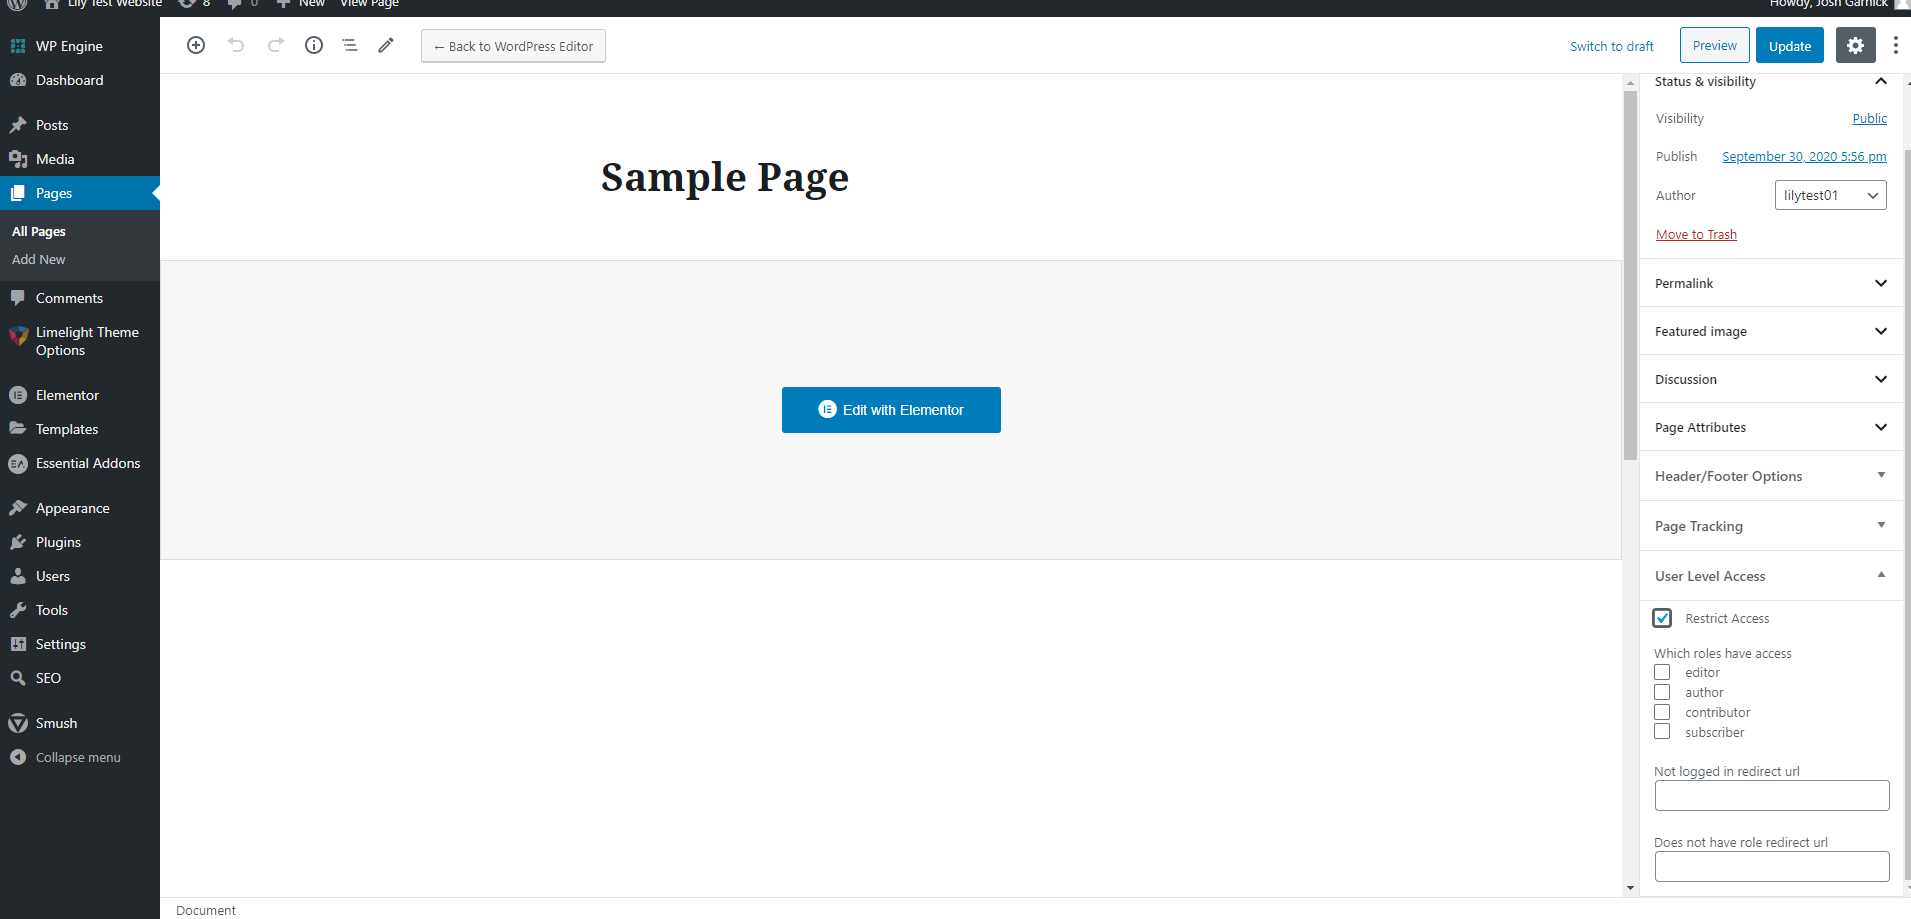
This is another way to change the user access for a single page. On the actual page level, you’ll note that on the right side settings bar, there’s a section labeled: “User Level Access.” Basically, this is another way to make sure that the correct roles have access to this page. A great part about this section too is that you can choose redirect URLs for this specific page. Not logged in? Redirect to the login page. Not a role that has access? Redirect to a sign up or upgrade page.
Another super cool part of the Limelight Theme is a custom-made, specialty integration that is available for the Limelight Theme only: content protection on the page level through Elementor.
This is an awesome feature that can restrict pages or even single blocks of content from specific users. You can also write what users will see instead of the regular page or content. On top of all of the other ways that you can restrict access for certain members or non-members, this is the icing on the cake for customizing your website.
Here’s an example of how it works:
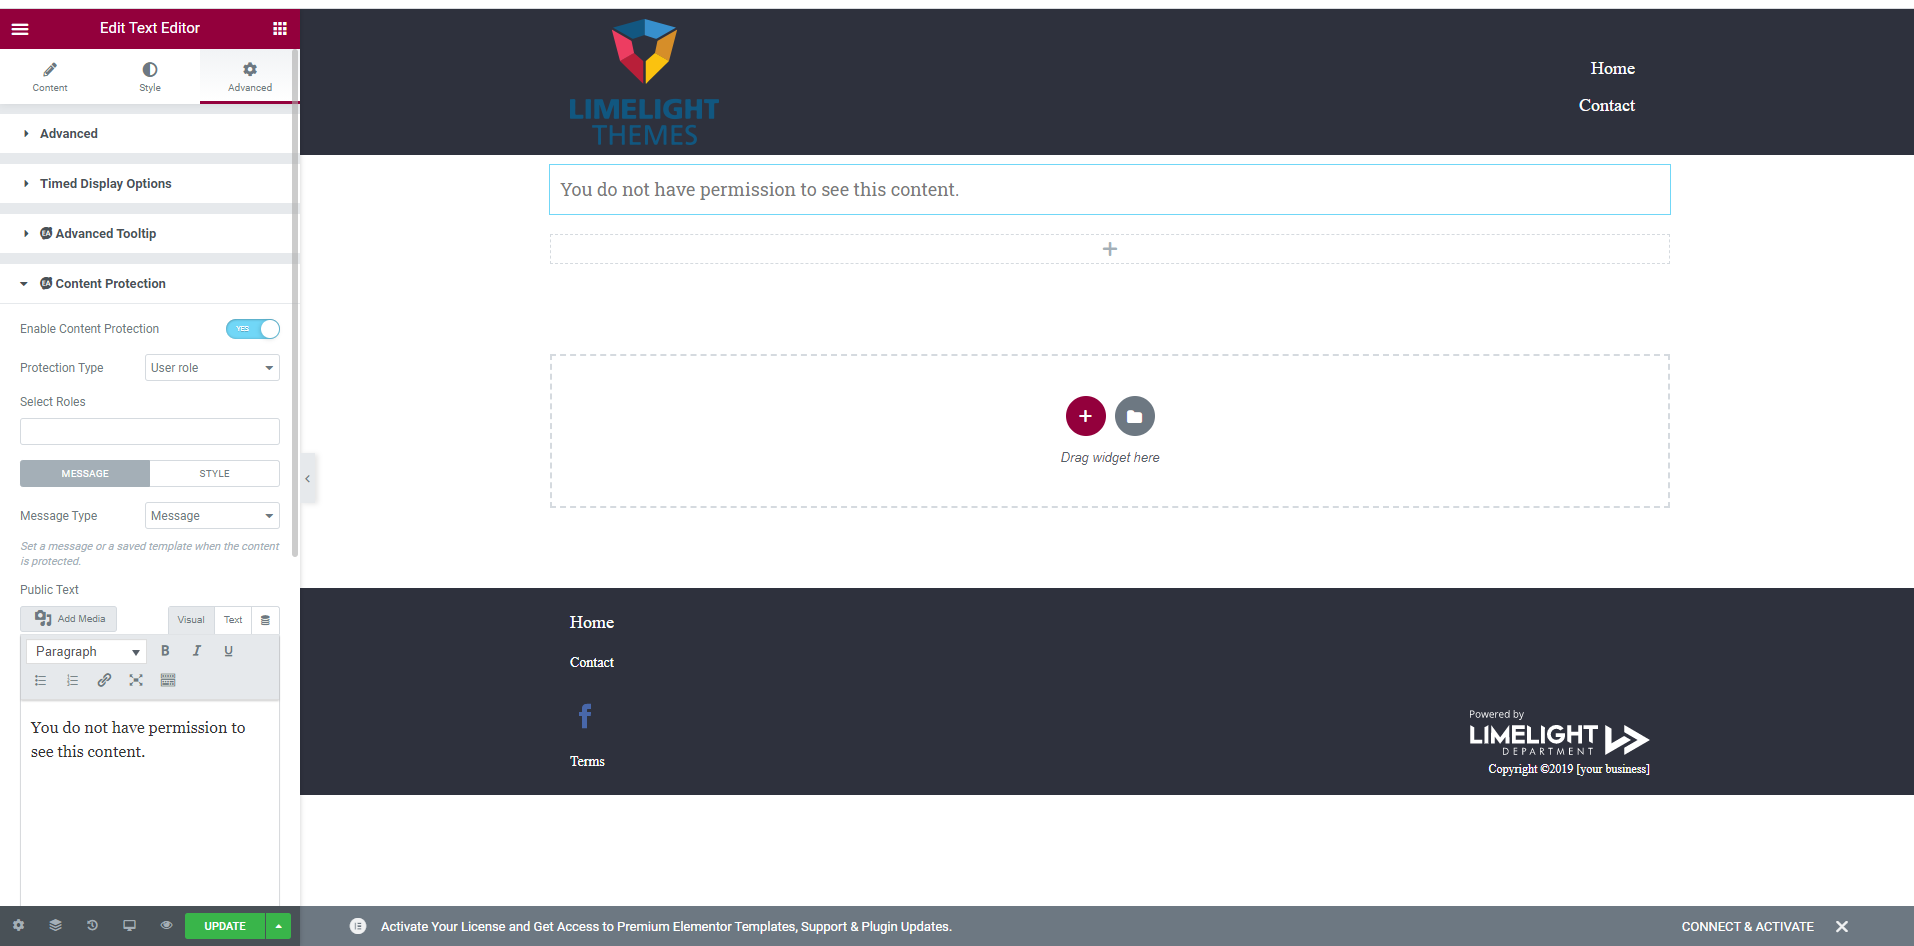
If a “basic” level user doesn’t have access to certain content but maybe has access to a page, or if somehow they find their way to a page that they shouldn’t have access to, they will be restricted from seeing the content if the “Protection Type” is set to “user role.” Then, you can select the different roles to restrict.
In our example, the restricted content box even shows the message, “You do not have permission to see this content.” You can personalize it to say whatever you want — want to say they can’t see it because they’re not at the pro level, and to view it all they have to do is upgrade? Done. More personalized for the viewer, and less confusing for them too.
The Result
The Limelight Theme comes with all the bells and whistles you’ll need to set up your membership website — that means you won’t have to go out and buy more plugins, “pro” versions, or a different theme. It’s an all-in-one, easy, and ready to use theme that helps keep the process of making online sales easier. Just upload it onto your WordPress site and get started!
For membership websites particularly, the Limelight Theme offers a form builder, a checkout builder, integrations with payment systems and immediate events after purchase, various ways to restrict access, and more.
And while this article may only cover the basics of setting up your website in order to support different tiered memberships, you have a lot of wiggle room to style, customize, and change your content to look exactly how you want it.
We believe that you should have the power to make your website the easiest way possible without sacrificing quality or sales potential. Let the Limelight Theme help you get there!
____________
If you don’t currently use the Limelight Theme for WordPress, click here for more information on what we have to offer! The Limelight Theme was built for marketers, by marketers, and will help keep your website sales-funnel oriented and optimize your marketing goals.